Leg Raises Are A Great Way To Prevent Lower-Back Pain – Here’s How To Do Them
This straightforward bodyweight exercise strengthens your deep-lying core muscles which can take some of the load off of your lower back
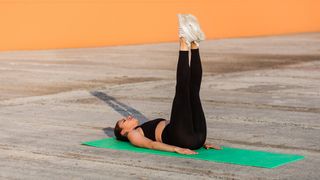
Once you’ve had lower-back pain you’re always on the look-out for ways of ensuring it doesn’t happen again. While getting an expert’s take on the leg raise we discovered it’s a move with injury-prevention credentials.
Here’s Fiona Scott, head of physical performance and academic liaison at Performance Herts at the University of Hertfordshire, to explain all.
Benefits Of The Leg Raise
“It’s a core exercise, and by core I mean the true core muscles: your pelvic floor, transverse abdominis, internal obliques and multifidus, which run down the spine,” says Scott.
“It works those muscles because you are keeping your body still while moving your legs. This style of core exercise works your lower core muscles more – the pelvic floor and the transverse abdominis – so you should feel it in the strip of muscles below the bellybutton.
“The transverse abdominis wraps around our lower stomach like a waistband and helps support our back. Lower-back injuries are common, unfortunately, so if we can keep the core strong we can alleviate the pressure put on the lower back.
“Another positive is that they’re easier to do for people with back injuries, keeping the spine neutral throughout while the legs do the movement. You don’t need any equipment, you just need to lie down, and there are loads of ways to make it easier or harder.”
Are leg raises better than sit-ups?
“They’re targeting different things,” says Scott. “Leg raises target core muscles like the pelvic floor and transverse abdominis, whereas sit-ups hit the rectus abdominis – the six-pack muscles.
“Both exercises are fit for purpose. For example, you need to be able to perform a sit-up if you want to be able to get out of bed in the morning so I don’t think it’s a bad exercise to be able to do!
“But I don’t tend to throw too many sit-ups into people’s programmes, purely because our rectus abdominis muscles are actually quite strong when flexed – they come into play when we’re sitting or in a slouching position.
“So, if I had to pick between sit-ups and leg raises, I would go for leg raises because they offer something we rarely do in everyday life and will help prevent back injuries.”
How To Do The Leg Raise
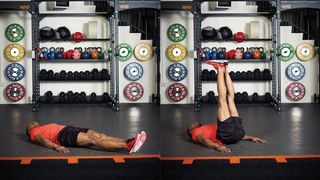
“Lie stretched out on your back and imprint your lower back into the floor,” says Scott. A coaching cue Scott uses is to think about drawing your bellybutton towards the floor.
Get the Coach Newsletter
Sign up for workout ideas, training advice, reviews of the latest gear and more.
She suggests placing your arms by your sides with your palms pushing into the floor for extra support. This way, your body will naturally create some downward force, making the movement slightly easier. Or, if you want more of a challenge, try keeping your arms across your chest.
“Lift both legs as high as your hamstring mobility will allow. On the way up, you’ll feel it in your core, in that strip of muscles below your bellybutton – this is a sign you’re doing it correctly.
“Don’t let gravity take over on the way down. Stay in control of the descent, so you’re training your core during both halves of the movement.”
She adds that you should “only lower your legs to a point where you can keep those muscles imprinted. I often get people to place their hands underneath their lower back and try to squash their fingers, so if they tried to wiggle them they would be clamped down.”
How many leg raises should you do?
“It depends on people’s training goals,” says Scott. “Most people should use leg raises for their injury-prevention credentials, keeping you and your back fit and healthy. This way, we can train our core muscles to be strong enough to help us with everyday tasks, whether that’s picking up a child, playing a sport, carrying your shopping or doing DIY.
“For this, people should use more endurance-based parameters, so 10 to 30 reps depending on their strength level. Or we often get people to complete for a duration of time rather than a number of reps, prioritising quality rather than just knocking out a set of 10.
“With this movement, time under tension is more important – can you do it in a slow, controlled fashion? I generally recommend working for 30 to 45 seconds, although you can challenge yourself to go further if you need more of a challenge.”
Leg Raise Variations
Knee raise
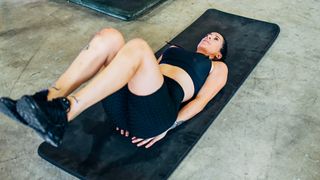
This is an example of what Scott calls a “short-levered version” of the leg raise, putting less force through your core by bringing your legs closer to your body.
“Lie on the floor, as you would for a lying leg raise, then bring both knees up to 90° with your thighs vertical,” says Scott. “Keep your lower back on the floor, lower your legs to tap your heels on the floor, then bring them back up to the starting position, keeping your knees at 90° throughout.”
Single leg raise
As explained above, one way to make the leg raise easier is to bend your knees during the movement, but another less taxing variation is to lift one limb at a time. Keeping one leg grounded will help stabilise your body as you raise the other leg, so you can focus on perfecting your form.
Medicine ball leg raise
Add an extra challenge for your abs, hips and adductors (the insides of your thighs) by gripping a medicine ball between your feet.
Weighted leg raise
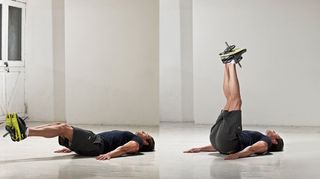
As with most exercises, you can make the leg raise tougher by introducing some weight. With this variation you hold a dumbbell or sandbell between your feet as you perform the exercise. Keep the weight light, because it really doesn’t take much to make the leg raise very challenging indeed, and also you don’t want a heavy dumbbell to slip when you’re holding it with legs fully extended above your crotch.
Leg raise on dip station
If you’re looking to take your leg raises airborne but aren’t quite ready to try the hanging leg raise yet, head for the dip station. You’ll work your core all the harder to keep your torso still, and your arms and shoulders get a workout as well. Supporting yourself on both arms, which should be extended and by your sides, raise your legs straight out in front of you, then slowly lower them again. If this is proving too tough then you can bend your legs and bring your knees up instead.
Hanging leg raise

About as tough as leg raising gets, this variation involves hanging from a pull-up bar or gymnastic rings while you raise your legs until they are parallel to the ground. Once again, you can start by bending your legs and raising your knees to your chest as a way of working up to the full exercise, and it’s also worth trying some dead hangs first to ensure you have the upper-body and grip strength to hold yourself up while leg raising.
Hanging knee raise
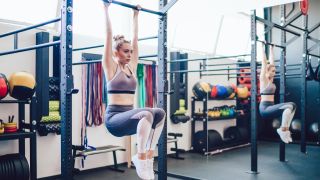
If you’re building up to the hanging leg raise, or halfway through a set of them and realise you haven’t got the strength to get through to the end, give the hanging knee raise a go. Hang from a bar with an overhand grip. Draw your knees up slowly until your thighs are parallel to the ground, then lower them slowly. It’s still a great move for hammering your abs, just not quite as tough as the full hanging leg raise.
Garhammer raise

Hanging knee and leg raises are both great exercises for working your core, but the garhammer raise makes one adjustment that makes it even more effective – if you can manage it. With both the leg and knee raise you extend your legs beneath you after each rep, which releases the tension in your abs; with the garhammer raise you don’t get that break, because you never extend your legs fully until the set is completed.
Hang from the bar with an overhand grip. Bend your legs and bring your knees up until your thighs are parallel to the ground. This is the starting position for the exercise. Bring your knees up as high as you can towards your chest, then lower them slowly until your thighs are parallel to the ground again. Don’t be surprised if you tap out earlier in the set than you expect, because maintaining the tension in your core muscles like this is brutal. You can always switch to the standard hanging knee raise halfway through a set if you do need the release.
About Our Expert
Fiona Scott is a strength and conditioning coach with 15 years’ experience in the sports and fitness industry. She has worked with the England and Arsenal women’s football teams, and Olympic and Paralympic athletes.
Scott is the head of physical performance and academic liaison at Performance Herts at the University of Hertfordshire.
She has a BSc in sport and exercise science from the University of Birmingham and an MSc in strength and conditioning from Middlesex University. Scott is also a certified strength and conditioning coach (CSCS), UK Strength and Conditioning Association accredited coach (ASCC) and corrective exercise specialist (CES).

Harry covers news, reviews and features for Coach, Fit&Well and Live Science. With over a decade of training experience, he has tried everything from powerlifting to gymnastics, cardio to CrossFit, all in a bid to find fun ways of building a healthy, functional body.
- Nick Harris-FrySenior writer
